Kia Forte: Front Suspension System / Front Lower Arm
Repair procedures
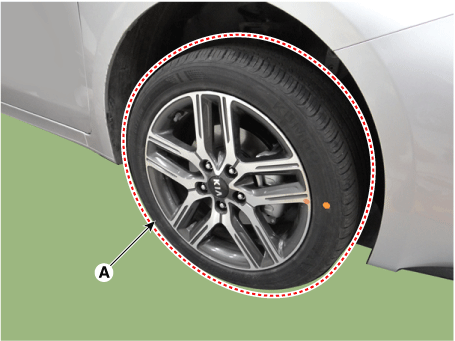
| 1. |
Remove the front wheel and tire (A).
|
Tightening torque:
107.9 - 127.5 N·m (11.0 - 13.0 kgf·m, 79.6 - 94.0 lb·ft)
|
|
Be careful not to damage to the hub bolts when removing the front
wheel and tire.
|
|
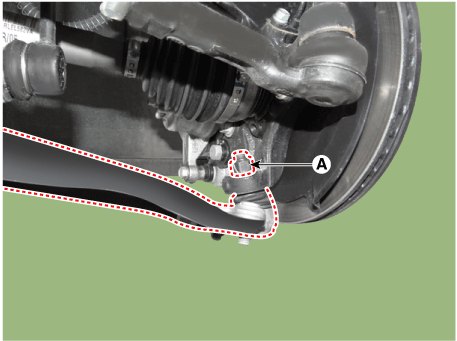
| 2. |
Remove the lower arm nut (A).
|
Tightening torque:
58.8 - 70.6 N·m (6.0 - 7.2 kgf·m, 43.4 - 52.1 lb·ft)
|
|
| 3. |
Detach the front lower arm from the front knuckle using the SST (09568-1S100).

| •
|
When using SST, be sure not to damage the dust cover
of lower arm ball joint.
|
| •
|
Keep SST tied to the car because there is a risk of injury
by dropping the SST during removing the lower arm ball joint.
|
| •
|
The peripheral parts may be damaged when removing the
lower arm ball joint with a general tool such as lever,
so be sure to use SST.
|
|
|
| 4. |
Remove the lower arm (A) from the sub frame.
|
Tightening torque:
Bolt (B) : 117.7 - 137.3 N·m (12.0 - 14.0 kgf·m, 86.8 - 101.3
lb·ft)
Bolt (C) : 156.9 - 176.5 N·m (16.0 - 18.0 kgf·m, 115.7 - 130.2
lb·ft)
|

|
| 5. |
Install in the reverse order of removal.
|
| 6. |
Check the wheel alignment.
(Refer to Front Suspension System - "Front Alignment")
|
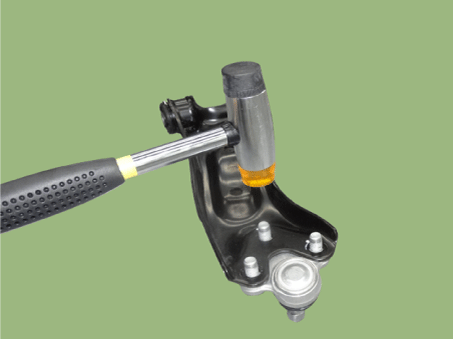
| 1. |
Disconnect the ball joint after loosening the nut (A).
|
Tightening torque :
117.7 - 137.3 N·m (12.0 - 14.0 kgf·m, 86.6 - 101.3 lb·ft)
|

| •
|
Using a plastic hammer, remove the ball joint.
|
| •
|
Do not to damage to the lower arm.
|
|
|
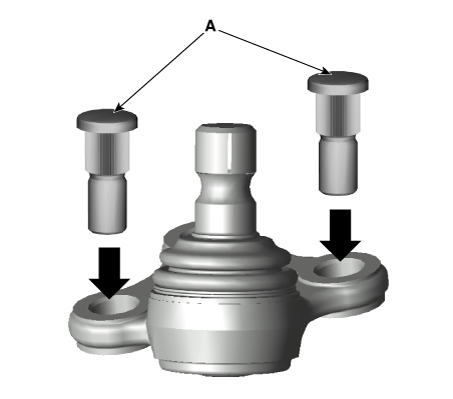
| 2. |
Install a new ball joint and then tighten the nut (A).
|
Tightening torque :
117.7 - 137.3 N·m (12.0 - 14.0 kgf·m, 86.6 - 101.3 lb·ft)
|
|
When replace the ball joint with a new one, insert the bolt(A)
into the ball joint with a certain pressure.
Insert the bolt to the ball joint without any gap.
|
|
| 1. |
Check the bushing for wear and deterioration.
|
| 2. |
Check the lower arm for bending or breakage.
|
| 3. |
Check the lower arm for deformation.
|
| 4. |
Check all bolts and nuts.
|
| 5. |
Check the ball joint rotating torque.
If there is an abnormality, replace the ball joint.
|
Standard value : 9.8 - 29.4 N·m (1.0 - 3.0 kgf·m, 7.2 - 21.7
lb-ft)
|
| (1) |
Move the ball stud (A) 5 times to the front and back, and rotate
5 times to evenly apply the grease. Fix the ball stud stationary
for 24 hours at the center, then roll 3 times to the front and back,
and rotate 3 times before measuring the torque.

|
| (2) |
Read the constant torque value within 180° when it is rotated
at speed of approximately 12°/s.
|
Standard value : 9.8 - 29.4 N·m (1.0 - 3.0 kgf·m, 7.2
- 21.7 lb-ft)
|
|
| (3) |
Make sure that the ball stud rotates smoothly.
|
|
| 6. |
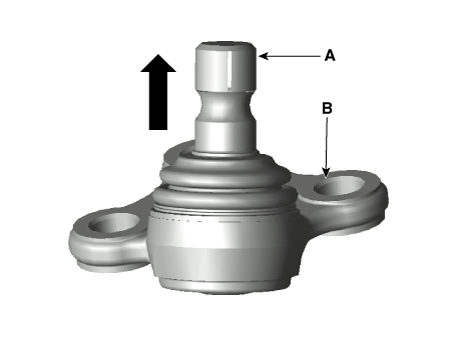
Check the ball stud(A) axial free play, In case of any free play exist,
replace the ball joint(B).
|
Components and components location
Components
1. Strut assembly
2. Spring lower pad
3. Coil spring
4. Dust cover
5. Bumper stopper
6. Spring upper pa ...
Repair procedures
Removal and Installation
1.
Remove the front wheel and tire (A).
Tightening torque :
107.9 - 127.5 N·m (11.0 - 13.0 kgf·m, 79. ...
Other information:
The sensitivity of vehicle speed when
following the front vehicle to maintain
the set distance can be adjusted. Go
to the User Settings Mode (Driver
Assistance) and SCC Reaction. You
may select one of following three
stages:
• Slow:
Vehicle speed to the vehicle ahead
to maintain th ...
When the tire pressure monitoring
system warning indicators are illuminated,
one or more of your tires is
significantly under-inflated.
If the telltale illuminates, immediately
reduce your speed, avoid hard cornering
and anticipate increased stopping
distances. You should stop and
...

 Front Strut Assembly
 Front Stabilizer Bar