Kia Forte: Trunk Trim / Rear Wheel House Trim
Components and components location
| Component Location |
[4 Door]

| 1. Rear wheel house trim |
[5 Door]

| 1. Rear wheel house trim |
Repair procedures
| Replacement |
[4 Door]
Put on gloves to prevent hand injuries. |

|

| 1. |
Remove the rear seat assembly. (Refer to Rear Seat - "Rear Seat Assembly") |
| 2. |
Remove the rear pillar trim. (Refer to Interior Trim - "Rear Pillar Trim") |
| 3. |
Remove the rear door scuff trim. (Refer to Interior Trim - "Door Scuff Trim") |
| 4. |
Carefully remove the rear door body side weatherstrip. |
| 5. |
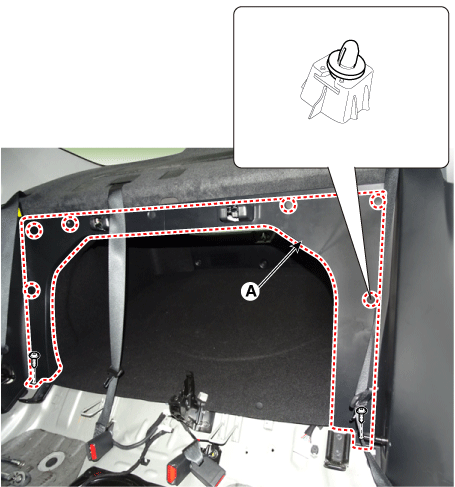
After loosening the mounting clips and screws, remove the rear partition trim (A).
|
| 6. |
Using a screwdriver or remover, remove the rear wheel house trim (A).
|

| 7. |
To install, reverse the removal procedure.
|

[5 Door]
Put on gloves to prevent hand injuries. |
|
| 1. |
Remove the rear seat assembly. (Refer to Rear Seat - "Rear Seat Assembly") |
| 2. |
Carefully remove the rear door body side weatherstrip. (Refer to Rear Door - "Rear Door Side Weatherstrip") |
| 3. |
After loosening the mounting screw, remove the rear wheel house trim (A).
|

| 4. |
To install, reverse removal procedure.
|
 Luggage Side Trim
Components and components location
Component Location
[4 Door]
1. Luggage side trim
[5 Door]
1. Luggage side trim
R ...
 Windshield Glass
Components and components location
Components
1. Windshield glass
2. Windshield glass molding
Repair procedures
Replacement
[Removal]
...
Other information:
Kia Forte 2019-2025 (BD) Service Manual: Rear Package Tray Trim
Components and components location Component Location 1. Package tray trim Repair procedures Replacement • Put on gloves to prevent hand injur ...
Kia Forte 2019-2025 (BD) Service Manual: SRS Control Module (SRSCM)
Description and operation Description The primary purpose of the SRSCM (Supplemental Restraints System Control Module) is to discriminate between an event that warrants restraint system deployment and an event that does not. The SRSCM must decide whether to deploy the restraint sys ...
